How to Set Up a Shopify Store: A Step-by-Step Guide
A plain, ordered guide to setting up a Shopify store from sign-up to launch: plan, store details, products, theme, domain, payments, shipping, taxes, policies, a test order and going public. It also says when to hire help.

A working Shopify store comes together fastest when you do the steps in a sensible order. This guide gives that order: account, plan, store details, products, theme, domain, payments, shipping, tax, policies, a test order and launch. For each step it says what to do, what people usually get wrong, and when to ask someone else.
We checked every Shopify rule below against Shopify's own help pages and public pages. The admin changes often, so we name menus only where a Shopify page confirms them. If a button has moved, search the admin or read the linked help page.
The order that saves rework
Some steps unlock others. The two that surprise people most come straight from Shopify's help centre:
- You can only test a payment gateway after you have chosen a paid plan. So pick the plan before you try a test order.
- To launch, you need a plan, a store address and a payment method with test mode switched off.
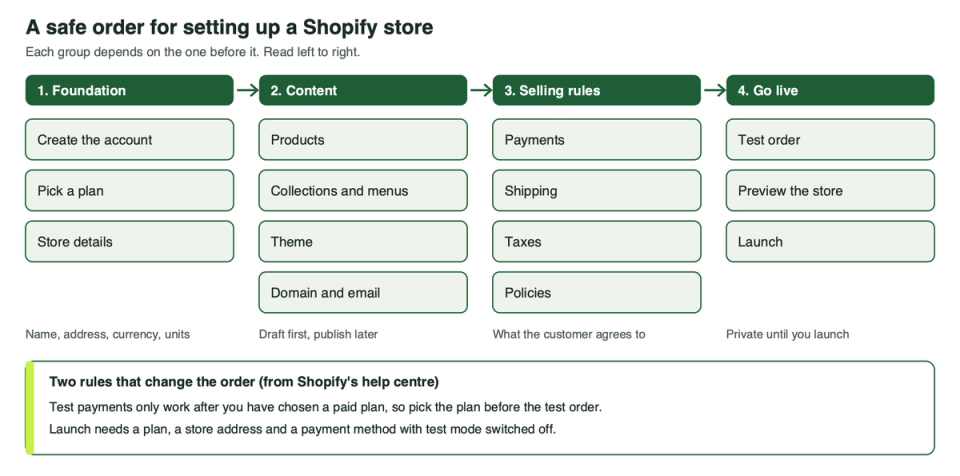
Your store stays private until you launch. Shopify says a new store is in private mode by default: visitors see a password page, and search engines see nothing. That gives you time to get it right.
For a shorter checklist version of this, see our Shopify launch checklist. Shopify also publishes its own general checklist for starting a new store.
Step 1: Create the account
Go to shopify.com and start for free. Shopify's help page says you can sign up with an email address and password, or with a Google, Apple or Facebook account. You can add billing details now or skip them, and you can skip the customised setup questions.
Two small choices matter later:
- Use an email you will still own in two years. It is the login to your whole business. A personal inbox that a freelancer or an old employer controls is a bad idea.
- Write down your myshopify.com address. Shopify generates one at sign-up. Even after you add a custom domain, you and your staff still use the original myshopify.com address to log in and when you contact Shopify Support.
Step 2: Pick a plan
Shopify's current plan names are Basic, Grow, Advanced and Plus, listed on its pricing page. We do not quote prices here, because they change and depend on your region. Read the page on the day you sign up.
What actually differs, according to Shopify's help pages and pricing page:
- Staff accounts. Basic allows no additional staff, Grow allows 5, Advanced allows 15, and Plus allows unlimited.
- Fraud analysis recommendations. Available on Grow or above, or on any plan that uses Shopify Payments.
- Live third-party shipping rates. Listed on the Advanced plan card on the pricing page.
- Markets. The number of markets you can create depends on your plan.
Pick Basic if it is just you, you sell in one country and you do not need staff logins. Pick a higher plan if you already know you need more staff accounts or live carrier rates. Match the plan to what you need on day one. If you are comparing Shopify with its enterprise tier, see Shopify vs Shopify Plus.
Shopify says that if you choose a plan during the free trial, you are not charged subscription fees until the trial ends. That is why we pick the plan early: it unlocks test payments and launch.
Step 3: Fill in your store details
Shopify's help page lists what to add first: store name, legal business name and address, time zone, default currency and default weight unit. These live under Settings > General. Notes on each:
- Store name. It shows on every page. The default is "My Store". You can change it at any time.
- Store address. Customers can see it on your store and policy pages. It is also a launch requirement. If you work from home and do not want your address public, Shopify suggests options such as a PO box or mailbox, but it warns that some legal disclosures need a physical address and do not accept PO boxes.
- Currency. Choose it early. Changing it after your first order needs an extra confirmation and carries risk, and if you use Shopify Payments you change it through the Payments bank and currency settings instead.
- Units. Pick the unit system and default weight unit before you add products. Weights matter later for shipping rates.
- myshopify.com name. You can change it for free only once. Choose carefully, or buy a custom domain and treat the myshopify.com name as your private login address.
- Order ID format. Orders start at #1001. You can add a prefix or suffix, not change the starting number.
Also set your home page title and meta description under Online Store > Preferences. Shopify says titles are limited to 70 characters and that search engines show only about 140 characters of a description.
Step 4: Add your first products
Open Products and choose Add product. Shopify's checklist says a product needs at least a title and a price. Everything else can come later, but this is where most of your time will go. Shopify itself says adding and organising products can be the most time-consuming part of setup.
Habits that save pain:
- Start with a handful of products that are complete: good photos, a clear description, correct weight and price. Finish those before you load the rest.
- Use variants, not duplicates, for size and colour. Shopify says to add a variant when you want options such as colour or size, and to duplicate a product only for a genuinely different product.
- Keep products as Draft until they are ready. Shopify products can be Active, Draft or Unlisted. Draft keeps a half-finished product off your store.
- Do not keep changing product URL handles. Shopify's checklist warns that frequent handle changes can hurt search rankings.
- Keep titles short, with the important words first. Long titles and descriptions can be cut off in search results.
- Set product category and weights now. Shopify Tax uses the product category to apply rates and exemptions, and calculated shipping needs accurate weights.
During first-time setup Shopify can add a sample product with pre-filled content so you can see what a finished listing looks like. You can edit or delete it later.
If you have hundreds of products, or you are bringing them from another platform, that is a good moment to think about help. See the hiring section below.
Step 5: Organise collections and menus
Collections are how shoppers browse. Shopify's help page says a collection can draw from your product list, from variants, from other collections or from apps, and that you can set conditions so products join automatically. Create them under Products > Collections.
Two things that people forget:
- A collection is not visible until it is linked. Add it to a menu. Under Content > Menus, the default main menu has Home and Catalog, and the footer menu has Search.
- Pages do not appear in menus by themselves. Create an About page and a Contact page under Online Store > Pages, then add them to a menu.
Our judgement: keep the first version of the navigation boring. Five or six clear collections beat a clever mega-menu on a store with twenty products.
Step 6: Choose and set up a theme
Your store opens with a default theme. To use another, add a free one from the admin or from the Shopify Theme Store. Shopify says free themes are built by Shopify and that Shopify supports customisation of them. Paid themes come from third-party designers, who support them, and Shopify says paid themes are non-refundable.
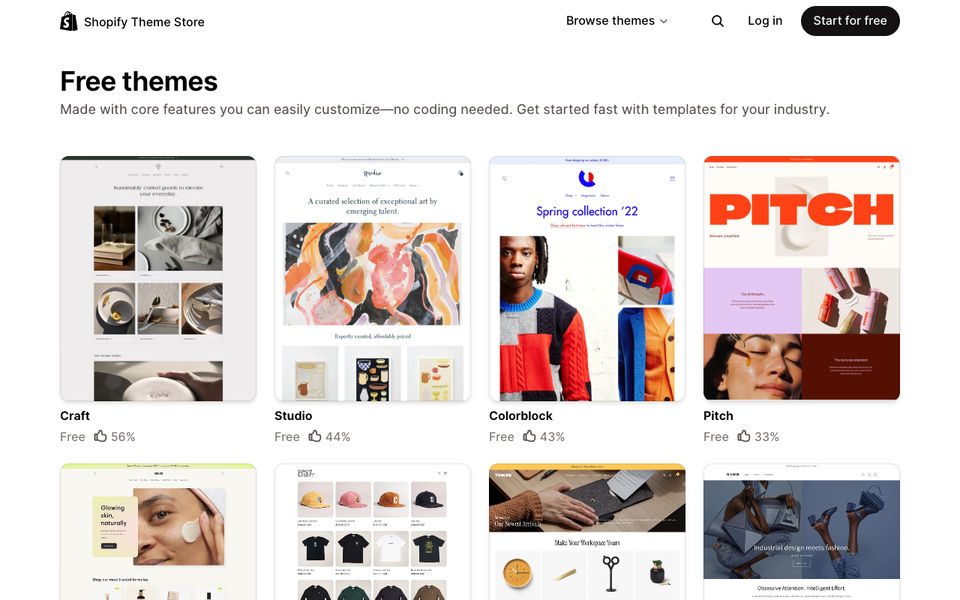
Two useful facts from Shopify's setup page:
- During your free trial, pick a free theme to avoid charges.
- You can try a paid theme in your own store before you buy, using your products and colours. Shopify says you can preview up to 19 paid themes at once.
Pick a free theme if this is your first store and your products are simple. Changing images, colours and layout in the theme editor covers most early needs. Pay for a theme, or for custom work, if you need a layout the free themes do not offer, and you have checked that the theme supports the features you need.
For help comparing options, read how to choose a Shopify theme and our list of free themes for Shopify.
Step 7: Set up your domain and store email
Every store has a myshopify.com address. A custom domain makes your brand look real and is worth doing before launch. Shopify gives three routes:
| Route | Who manages the domain | Good for |
|---|---|---|
| Buy through Shopify | You manage everything in the Shopify admin | A new store with no domain yet |
| Connect a domain you already own | You keep managing and renewing it with your domain provider | A domain you already use |
| Transfer a domain to Shopify | You move management into the Shopify admin | Wanting one place for everything |
Other points from Shopify's domain pages:
- When you add a domain by any method, Shopify creates a TLS certificate for it automatically at no charge.
- Set your custom domain as the primary domain, so it is the address customers see in browsers and search results.
- You can add up to 20 domains or subdomains, besides your myshopify.com address.
Then set up the email that your store sends. Shopify's checklist says sender authentication (SPF and DKIM records) is required by major email providers such as Gmail and Yahoo, and that without it your store emails might land in spam. Order confirmations in the spam folder are a support headache you can avoid on day one.
Step 8: Set up payments
Open Settings > Payments. For most new stores the simplest choice is Shopify Payments. Shopify's help page says it is available only in certain countries and regions, so check the supported list first. To use it you must secure your account with two-step authentication.
The trade-off to understand is fees. Shopify says you are not charged third-party transaction fees on orders processed through Shopify Payments, but if you use Shopify Payments alongside another provider, transaction fees apply. For the details, see our article on whether Shopify takes a percentage of sales, and check Shopify's own fee pages for your country.
Three other points:
- Subscriptions need Shopify Payments as the primary payment provider, according to Shopify's checklist. Decide this before you pick a provider if you plan to sell subscriptions.
- If Shopify Payments is not available where you are, you will use a third-party provider. Check that provider's own terms and test mode.
- Do not leave payments to the last hour. Shopify Payments has its own onboarding, with bank account requirements and, per Shopify's help pages, account verification steps. Start it early so it is not the thing that blocks your launch.
Step 9: Set up shipping
Shopify creates a set of shipping rates for you automatically, both domestic and international. Its help page warns that these often include a free shipping rate, and tells you to review them before you open your store. This is one of the easiest ways to ship a loss-making free-shipping offer by accident.
Shopify describes three main strategies:
| Strategy | Pick this if | Skip this if |
|---|---|---|
| Flat rate | You want clear, predictable costs and delivery estimates | Your parcel costs vary a lot by weight and distance |
| Free shipping | You are happy to build shipping cost into your prices | Your margins are thin and parcels are heavy |
| Carrier-calculated | You want exact costs charged at checkout | You want to show shipping costs before checkout, or you do not have accurate weights and package sizes |
Shopify notes that carrier-calculated rates only appear at checkout, which can lead to surprise costs and abandoned carts, and that they need exact product weights and package dimensions. It also says shipping is never really free, so a common practice is to build part of the cost into product prices. For more on free shipping, see free shipping on Shopify.
If you plan to sell to other countries, Shopify says a country must be in an active market before you can sell there. You can also set up local pickup and local delivery if you have a physical location.
Step 10: Set up taxes
Tax is your responsibility, and Shopify says so plainly: it does not file or remit your taxes unless you use Shopify Tax with automated filing. What you can use depends on your region. In the United States, the EU, the UK and Canada, Shopify Tax is available, with manual tax settings as the alternative. Elsewhere the options differ, and paid tax apps work in all regions.
Shopify's general steps are:
- Work out where you must collect tax. This usually starts with where you run your business.
- Register with the right state or country authority.
- Start collecting tax in Settings > Taxes and duties.
- Add exemptions or overrides for reduced-rate products or exempt customers.
- File returns on the schedule your authority gives you.
Shopify says to confirm the default rates are current and correct for your situation, and to check with a local tax authority or accountant. We agree. Tax is the place where a cheap hour of professional advice is worth more than anything you read online, including this guide.
Step 11: Add your store policies
Policies show customers what to expect and are often needed for sales channels. Shopify's help page says you can manage return policy, privacy policy, terms of service, shipping policy, legal notice, contact information and subscription policy. You do it under Settings > Policies.
Shopify offers automated store policies for the return and refund policy, terms of service, shipping policy and contact information. When you turn on Use automated policy, Shopify fills the policy from your store settings and keeps it in sync when those settings change. You can turn automation off to write your own text.
Read the cautions Shopify gives, because they are specific:
- The automated policies are informational and are not legal advice. You are responsible for their accuracy.
- You may need to add disclosures if you offer auto-renewing subscriptions, sell regulated products (alcohol is Shopify's example), sell goods with market-specific rules (cosmetics, electronics, children's products or food-contact materials), or run a child-directed site.
- Policies are public, and often show your address, phone number and email. Use business contact details, not personal ones.
- Do not promise delivery times you cannot meet.
Shopify also runs free refund policy, privacy and terms generators that email you a draft. Its page says the templates are not legal advice. Treat any template as a first draft.
Hire a lawyer if you sell supplements, skincare, alcohol, children's goods or anything else with its own rules. A template cannot know your product.
Step 12: Keep apps to the minimum
Do not install apps until the core store works. Every app adds cost, scripts or both, and you will not know which one slowed your store if you add ten at once.
A sensible first set is short. You probably need none at launch. Add one when you can name the job it does: reviews, email capture, upsells or an inventory tool. Shopify's checklist warns that app charges might continue after you pause or deactivate your store until you uninstall the apps.
Our guide to the best free Shopify apps explains what each kind of "free" costs and has an audit you can run later. If you want help drafting product copy or finding settings, Shopify's built-in assistant is covered in our Sidekick guide.
Step 13: Place a test order
Shopify says a test order checks your checkout, order processing, inventory, shipping and taxes together. Place at least one during setup, and again whenever you change payment settings.
You have three ways to do it:
- Shopify Payments test mode. Turn on Use test mode in your payment settings, place an order with Shopify's test card details, then switch test mode off.
- The Test payment gateway. Any store can use it, but you must first deactivate any credit card provider you have active. Shopify says test orders need to be above the equivalent of one US dollar, and that the gateway does not work with Shopify POS or subscription products.
- A real payment, then cancel and refund. Shopify mentions this as an option, with the warning that your processor might still charge fees.
What to look at once the order is in:
- Did the order confirmation email arrive, and did it avoid spam?
- Is the shipping rate right for your address?
- Is the tax line what you expect?
- Did inventory go down?
- Can you fulfil, refund and cancel the order as you would for a real customer?
Two warnings from Shopify. Test orders and simulated transactions do not show in payouts or reports. And customers cannot place live orders while a payment provider is in test mode, so remember to turn test mode off before you launch.
Step 14: Preview and launch
Use Preview store in the Online Store area to see the storefront as a customer would. Check it on a phone as well as a laptop, because many shoppers will use one.
To go public, Shopify's help page lists the required steps: choose a plan, add a store address under Settings > General, and set up a payment method with test mode deactivated. Then you can launch from the Home page, the Online Store page or Online Store > Preferences by switching off private mode.
Before you press the button, read your own policies, shipping rates and contact details once more. They become public the moment you launch. A short pre-launch pass:
| Check | Why |
|---|---|
| Plan chosen | Required to launch and to run test payments |
| Store address added | Required to launch, and shown to customers |
| Payment method live, test mode off | Required to launch. Customers cannot place live orders while test mode is on |
| Free shipping rates reviewed | Automatic rates often include a free option |
| Policies read and linked in a menu | Public once you launch |
| Domain set as primary, email authenticated | Brand and deliverability |
| One real-looking test order done | Proves checkout, tax, shipping and email together |
After launch, Shopify's checklist suggests next steps such as submitting a sitemap to search engines and adding sales channels. Search engines can take a couple of days to index new pages, so do not panic on day one.
Should you hire help?
Most small stores can do the core setup alone. A theme, a few collections, Shopify Payments and a sensible shipping rate are well within reach of a careful beginner. The cases where help pays for itself are specific.
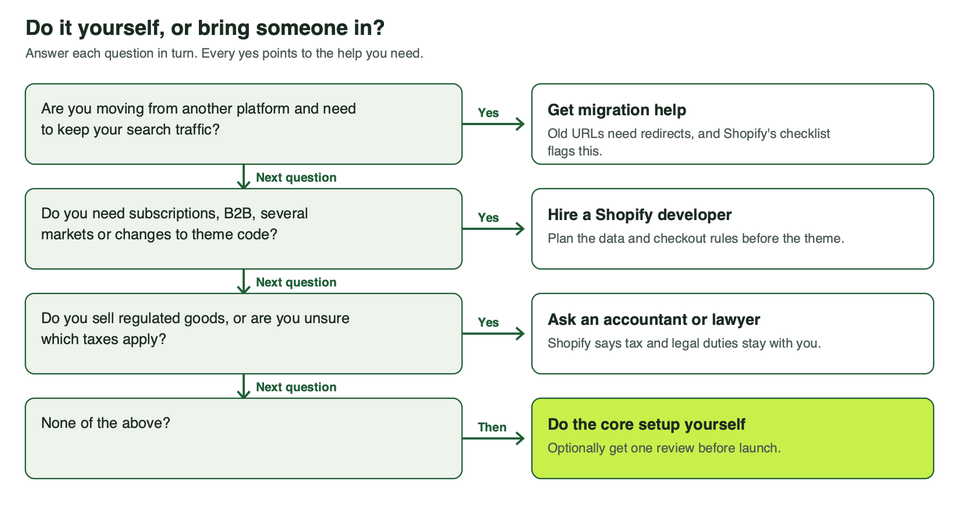
Do it yourself if you have under a few dozen products, one country, simple shipping and no special product rules. Spend your money on photos instead.
Get help if:
- You are moving from another platform and have search traffic to keep. Shopify's own checklist says you might need URL redirects to preserve your rankings. Getting those wrong is how stores lose traffic.
- You need something the admin does not do out of the box. That means custom theme code, subscriptions, B2B, several markets or a complex catalogue. Decide the data and checkout rules before choosing a theme.
- You sell regulated products. An accountant and a lawyer come before a developer.
- You have a firm launch date and no time. Paying for a setup is a legitimate way to buy time.
Shopify's Partner Directory lists partners by service, including store setup and development, and Shopify's own help pages point to it when you need help with products or a custom domain. It is a good place to compare people. Ask for examples of stores they have set up, what is included and what is not, and who owns the store account at the end. You should be the owner.
If you want a second opinion on a set-up plan, or you are weighing a build against a do-it-yourself start, talk to us. We would rather tell you honestly that a free theme and an afternoon is enough than sell you a project you do not need.
Common setup questions
How long does it take to set up a Shopify store?
It depends mostly on how many products you have and how ready your photos and descriptions are. Shopify says adding and organising products can be the most time-consuming step. The settings steps, like payments, shipping, tax and policies, are shorter if you have your business details to hand.
Do I need a custom domain to launch?
No. Your store has a myshopify.com address from the start. A custom domain looks more professional and is easy to add, but it is not a launch requirement. Shopify's list of launch requirements is a plan, a store address and a payment method with test mode off.
Can I set everything up during the free trial?
Yes, you can build most of the store during the trial. Your store is private during the trial. But to test payments you must first pick a paid plan, and to launch you must pick a plan too. Shopify says that if you pick one during the trial, you are not charged subscription fees until the trial ends.
Do I have to pay for a theme?
No. Shopify has a set of free themes, and Shopify supports customisation of them. Paid themes are an option if you need something specific. You can try a paid theme in your store first, but Shopify says paid themes are non-refundable once bought.
Do I need a lawyer for my policies?
Shopify's templates and generators are a starting point and are not legal advice. For a simple store they may be close to enough, after you read and edit them. For regulated products, subscriptions or a site aimed at children, Shopify itself says to consult a lawyer.
Who handles sales tax?
You do. Shopify can calculate tax and, with Shopify Tax and automated filing, can help with filing, but it does not file or remit by default. Register with the relevant authority, set up collection in the admin, and check with an accountant.
Can I change my store name or myshopify.com address later?
You can change the store name whenever you like, though if you use Shopify Payments you also need to contact Shopify Support to change the business name on that account. The myshopify.com address can be changed for free only once, so choose with care.
What should I do straight after launch?
Place a real small order if you can, watch your first few orders end to end, and check that emails arrive. Then add one thing at a time: sales channels, email marketing and search setup. Our launch checklist has a longer version.
Sources
The pages this guide rests on. Read the current version before you rely on a detail.
- help.shopify.com/en/manual/intro-to-shopify/initial-setup
- help.shopify.com/en/manual/intro-to-shopify/initial-setup/setu...
- help.shopify.com/en/manual/intro-to-shopify/initial-setup/setu...
- help.shopify.com/en/manual/intro-to-shopify/initial-setup/setu...
- help.shopify.com/en/manual/intro-to-shopify/initial-setup/setu...
- help.shopify.com/en/manual/intro-to-shopify/initial-setup/new-...
- help.shopify.com/en/manual/products/add-update-products
- help.shopify.com/en/manual/domains/add-a-domain
- help.shopify.com/en/manual/payments/shopify-payments
- help.shopify.com/en/manual/payments/shopify-payments/onboardin...
- help.shopify.com/en/manual/fulfillment/setup/shipping-rates
- help.shopify.com/en/manual/fulfillment/setup/shipping-rates/sh...
- help.shopify.com/en/manual/taxes
- help.shopify.com/en/manual/taxes/general-steps